Scaling Out OAS Oracle Analytics Server Guide : Short Answer
This guide provides a step-by-step overview of how to scale out Oracle Analytics Server (OAS) horizontally for enterprise deployments.It explains the key phases of expanding an OAS environment from preparing the primary host and cloning the domain, to configuring secondary hosts and verifying cluster functionality.By following these best practices, administrators can achieve a high-availability, fault-tolerant, and performance-optimized OAS cluster. The article also covers essential post-scale-out configurations for Oracle Analytics Publisher, ensuring full integration, reliable scheduling, and consistent data access across all nodes.
1.0 Introduction and Prerequisites for Horizontal Scaling
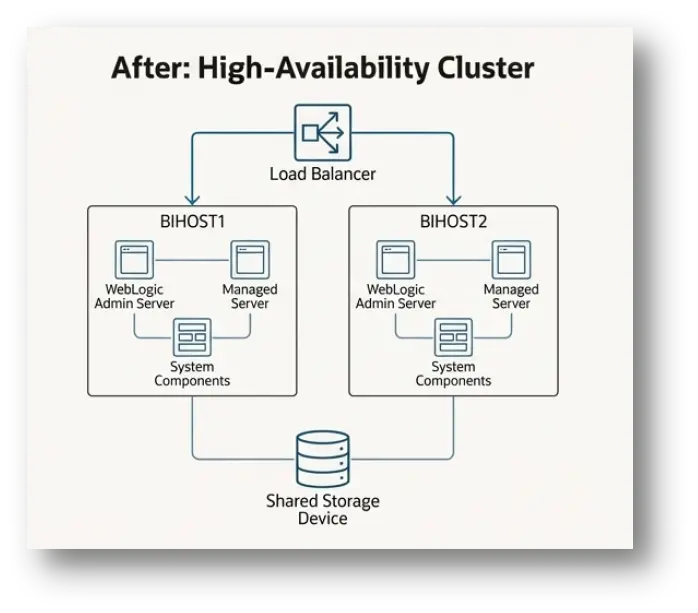
1.1 Horizontal scaling, or “scaling out,” is the process of expanding an Oracle Analytics Server (OAS) deployment by adding new server instances across multiple host computers. This strategy is of critical importance for any enterprise deployment, as it provides the foundation for high availability, robust fault tolerance, and significantly improved performance under heavy user loads. By distributing components across a cluster, the system can handle more requests and continue operating even if one host encounters an issue.
1.2 The scale-out procedure involves several distinct phases. The process begins by preparing the primary host and performing a clean shutdown of all services. Next, the core domain configuration is cloned to define the new components for the secondary host. This configuration is then packaged into a template, which is propagated to the new host and unpacked. Finally, the entire expanded cluster is started, followed by essential post-configuration tasks to ensure all applications, such as Oracle Analytics Publisher, function correctly in the new distributed environment.
1.3 Software Installation Prerequisites
Before beginning the cloning and propagation process, the necessary Oracle software must be installed on the secondary host computer (e.g., BIHOST2). This ensures that the new host has the required binaries to run the managed server components.
- Install Oracle Fusion Middleware Infrastructure:The base Fusion Middleware Infrastructure must be installed on the secondary host. This provides the core application server foundation upon which Oracle Analytics Server runs.
- Install Oracle Analytics Server:The Oracle Analytics Server software must also be installed on the secondary host. This installation provides the specific OAS binaries and libraries needed for the new components.
Note: For enterprise deployments, it is recommended to follow shared storage best practices. If you have configured a separate shared storage volume for secondary hosts, these software installations should be performed on one of those hosts. Adhering to this practice simplifies future patching and maintenance, as updates only need to be applied once for all nodes that mount that storage.
With the foundational software in place on the new host, the first hands-on actions can begin on the primary server.
2.0 Preparing the Primary Host (BIHOST1): A Pre-Cloning Shutdown Sequence
A methodical and complete shutdown of the primary host is a non-negotiable prerequisite for a successful domain clone. This sequence ensures transactional integrity and prevents configuration drift from corrupting the new cluster members. Proceeding without a clean shutdown can lead to an inconsistent clone and significant issues when starting the scaled-out environment.
2.1 Stopping the System Components
Follow these steps to stop the core Oracle Analytics Server system components using Fusion Middleware Control.
- Access Fusion Middleware Control by navigating to the following URL: http://*ADMINVHN*:7001/em
- Sign in using your Administration Server credentials.
- In the Target Navigationpane, expand the Business Intelligence folder and select biinstance.
- On the Business Intelligence Overview page, click the Availabilitytab, then select the Processes sub-tab.
- Click Stop Allto stop all the system components.
2.2 Stopping the WLS_BI1 Managed Server
Next, stop the primary managed server (WLS_BI1) that hosts the Oracle Analytics Server applications.
- In the Target Navigationpane of Fusion Middleware Control, expand the WebLogic Domain folder and select your domain to view the servers.
- Select only the WLS_BI1Managed Server from the list.
- From the toolbar, click Shut Down….
- After the operation completes, return to the Domain home page and verify that the status of the WLS_BI1 server is “down”.
2.3 Stopping the Administration Server
The Administration Server is stopped using the WebLogic Scripting Tool (WLST) to connect to the Node Manager.
- Open a terminal and start WLST:
- Connect to the Node Manager using the credentials defined during domain creation:
- Stop the Administration Server instance:
- Exit the WLST utility:
2.4 Stopping All Node Manager Instances
Finally, stop the Node Manager processes in both the Administration Server and Managed Server domain homes.
Stopping the Node Manager in the Administration Server Domain Home
- Navigate to the bin directory within the Administration Server domain home: cd *ASERVER_HOME*/bin
- Execute the stop script:
Stopping the Node Manager in the Managed Server Domain Directory
- Navigate to the bin directory within the Managed Server domain home: cd *MSERVER_HOME*/bin
- Execute the stop script:
At this point, all services on the primary host are shut down, and the system is fully prepared for the domain cloning operation.
3.0 Domain Cloning and Propagation
This phase is the architectural core of the scale-out, where the configuration for the secondary host (BIHOST2) is defined and deployed. The process leverages powerful, purpose-built WLST functions like cloneBIMachine, which automates the complex task of creating definitions for a new managed server (WLS_BI2), its associated system components (OBIS, OBIPS, etc.), and the machine it resides on, all while ensuring they are correctly targeted to the BI cluster. This is accomplished in three stages: cloning the machine definition, packing the domain into a template, and unpacking it on the target host.
3.1 Detailing the Steps to Clone the Components on BIHOST1
The following steps are performed on BIHOST1 using WLST to create the configuration for the new machine and its associated components.
- Start WLST:
- Open the existing domain configuration for editing. The *ASERVER_HOME* variable must point to the domain directory located on shared storage.
- Execute the cloneBIMachine command to duplicate the existing server and machine configuration for the new host.
- *ASERVER_HOME*: The full path to the domain directory on shared storage.
- example.com: The listen address for the new machine, BIHOST2VHN.
- baseMachine: The name of the existing machine to use as a template (BIHOST1).
- baseServer: The name of the existing managed server to clone (WLS_BI1).
- machineName: The name to assign to the new machine configuration (BIHOST2).
- Update and save the modified domain configuration:
- Close the domain:
- Exit WLST:
3.2 Explaining the Process of Packing the Initial Domain on BIHOST1
The pack command creates a template .jar file that contains the complete domain configuration, which now includes the definitions for BIHOST2.
- On BIHOST1, execute the pack.sh command:
- *ASERVER_HOME*: The path to the domain directory on shared storage.
- *complete_path*: The absolute path where the template file should be created.
- jar: A sample name for the output template file.
- bi_domain_template: The internal name assigned to the template within the .jar file.
3.3 Outlining the Procedure for Unpacking the Domain on BIHOST2
The final step is to transfer the template file to the new host and unpack it to create the local domain home for the new managed server.
- Log in to the secondary host, BIHOST2.
- Copy the bidomaintemplate.jar file from BIHOST1 to a temporary location on BIHOST2.
- Execute the unpack.sh command to deploy the domain configuration:
- *MSERVER_HOME*: The full path to the Managed Server domain home that will be created on the local storage of BIHOST2.
- *complete_path*/bidomaintemplate.jar: The full path to the template file you copied to BIHOST2.
- *APPLICATION_HOME*: The full path to the application directory for the domain, located on shared storage.
- After the command completes, navigate to the newly created *MSERVER_HOME* directory and verify that the domain configuration files have been successfully copied to this location.
The domain configuration has been successfully extended and deployed to the new host, and the entire clustered environment is ready to be started.
4.0 System-Wide Startup and Verification
4.1 With the domain successfully propagated, the next critical phase is to methodically start all components across both BIHOST1 and BIHOST2. This ordered startup ensures all servers and processes come online correctly and establish communication within the newly formed cluster. This process concludes with a verification step to confirm the scale-out was successful.
4.2 Component Startup Sequence
Follow this sequence to start the entire scaled-out environment:
- Start Node Manager (Admin Server Home):On BIHOST1, start the per-domain Node Manager for the Administration Server domain located in the *ASERVER_HOME* directory.
- Start Administration Server:On BIHOST1, start the Administration Server using the Node Manager.
- Start Node Managers (Managed Server Homes):Start the per-domain Node Managers located in the *MSERVER_HOME* directories on both BIHOST1 and BIHOST2.
- Configure and Start Managed Servers:
- First, configure the Node Manager listen address for the newly added machine (BIHOST2). Log in to Fusion Middleware Control and navigate to WebLogic Domain > Environment > Machines.
- In the Change Center, click Lock & Edit.
- Select BIHOST2, go to the Configuration > Node Managertab, and update the listen address to the correct value for BIHOST2.
- Click Save, and then click Activate Changesin the Change Center.
- Start both the WLS_BI1 (on BIHOST1) and WLS_BI2 (on BIHOST2) Managed Servers.
- Start System Components:Using Fusion Middleware Control, start all Oracle Analytics Server system components.
4.3 Verifying Oracle Analytics Server URLs
Once all components are running, verify that the new instance on BIHOST2 is operational and correctly integrated with the cluster’s front-end address.
- Access the primary analytics URL on the new host: http://BIHOST2VHN:7003/analytics You should be redirected to the cluster’s front-end URL: http://bi.example.com/analytics
- Access the Oracle Analytics Publisher URL on the new host: http://BIHOST2VHN:7003/xmlpserver You should be redirected to the cluster’s front-end URL: http://bi.example.com/xmlpserver
The core scale-out is now complete and verified. The final step is to perform several application-specific configuration tasks required for Oracle Analytics Publisher to function correctly in the cluster.
5.0 Post-Scale-Out Configuration for Oracle Analytics Publisher
For Oracle Analytics Publisher to function correctly in a new clustered environment, several specific configuration tasks are required. These steps ensure that all instances of Publisher share a common configuration, can communicate with the scheduler, and are properly integrated with other Oracle BI components. This section provides the detailed procedures for ensuring data and scheduling services are properly configured for the scaled-out topology.
5.1 Copying Publisher Configuration to the Singleton Data Directory (SDD)
This action provides a common configuration location for all Publisher instances in the cluster, ensuring consistent behavior.
- Recursively copy the default Publisher configuration directory to the SDD repository location. The *ORACLE_RUNTIME*/biconfig path is an example of the SDD location.
- Validate that the contents were copied correctly. The output should list the subdirectories as shown below.
- Expected output:
- Restart both the WLS_BI1 and WLS_BI2 managed servers for the changes to take effect.
5.2 Updating the JMS Shared Temp Directory
This task configures the Java Messaging Service (JMS) for the Publisher scheduler to use a shared location, which is essential for clustered scheduling. This only needs to be performed on one of the hosts.
- Sign in to Oracle Analytics Publisher using one of the host URLs (e.g., http://BIHOST1VHN:7003/xmlpserver).
- Navigate to the Administrationtab and select Scheduler Configuration under System Maintenance.
- Update the Shared Directoryfield with a path to a directory on shared storage that is accessible from both BIHOST1 and BIHOST2.
- Click Test JMS. You should receive a confirmation message that the test was successful.
- Click Applyto save the changes.
5.3 Configuring Integration with BI Presentation Services
This step ensures that Oracle Analytics Publisher is properly integrated with the BI Presentation Services in the clustered environment.
- In Publisher, navigate to the Administrationtab, and under Integration, select Oracle BI Presentation Services.
- Select the Manual Configuration
- Verify and update the fields with the cluster’s internal front-end address values:
- Server Protocol:HTTP
- Server:mycompany.com
- Port:80
- URL Suffix:analytics-ws/saw.dll
- Click Apply.
- Restart the Oracle Analytics Publisher application.
5.4 Setting the Oracle Analytics Server Data Source
The data source used by Publisher must be updated to point to the clustered BI Server via the Cluster Controllers.
- In Publisher, navigate to the Administrationtab, and under Data Sources, select JDBC Connection.
- Update the Connection Stringparameter with the following cluster-aware format:
- For example:
- To find the correct port number for the Cluster Controller:
- Log in to Fusion Middleware Control.
- Navigate to Target Navigation > Business Intelligence > biinstance.
- Click the Availabilitytab, then the Processes sub-tab.
- Note the port number for the BI Server process from the Port
- Select the Use System User
- Click Test Connectionand verify you receive a “Connection established successfully” message.
- Click Apply.
5.5 Configuring the BIPJmsResource JMS Module
The default Java Messaging Service (JMS) forwarding policy is not suitable for a cluster and must be changed. The default Partitioned policy could result in a scheduled job message being sent to only one member of the cluster. Changing it to Replicated ensures that the JMS topic is duplicated across all cluster members, guaranteeing that any available instance can pick up the job. This is essential for achieving high availability and proper load balancing of scheduled tasks.
| Property Name | Description |
| JMS Resource | BIP distributed topic in a cluster configuration – dist_BIP.System.T_auto |
| Property | Forwarding Policy |
| Description | A distributed BIP topic in a cluster installation is configured by default with the Forwarding Policy set to Partitioned. |
| Recommended Setting | Change the Forwarding Policy to Replicated. |
To apply this change:
- Sign in to the Oracle WebLogic Server Administration Console.
- In the Change Center, click Lock & Edit.
- In the left navigation pane, navigate to Services > Messaging > JMS Modules.
- Click BIPJMSResourcein the list of modules.
- Select System.T_auto_1from the Summary of Resources table.
- Select the General
- From the Forwarding Policydropdown menu, select Replicated.
- Click Save.
- In the Change Center, click Activate Changes.
With these Publisher-specific configurations complete, the Oracle Analytics Server horizontal scale-out is now fully functional and robust.
FAQs
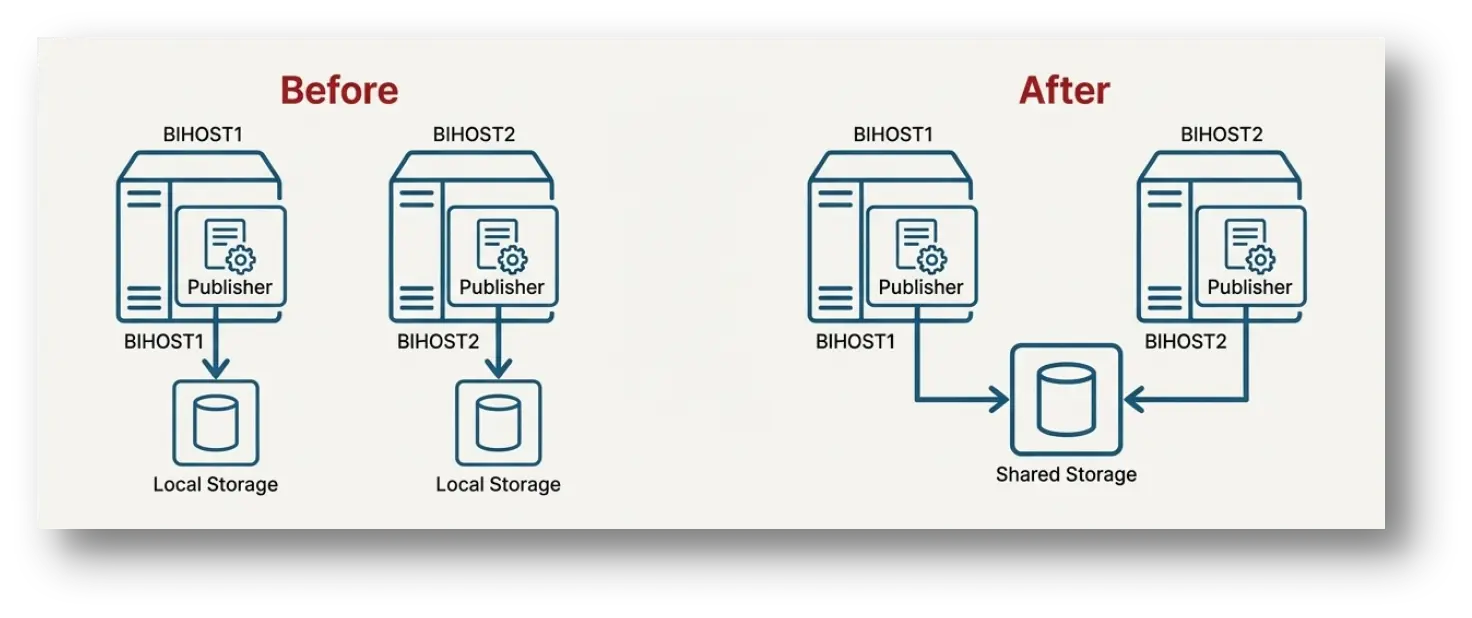
1.Why is shared storage recommended for secondary OAS hosts?
Shared storage (NAS/SAN) reduces maintenance overhead by approximately 50% in enterprise environments. By installing binaries on a shared volume, administrators apply patches once for the entire cluster, eliminating the risk of version mismatch across nodes and ensuring 100% binary consistency.
2.What is the specific function of the cloneBIMachine command?
The cloneBIMachine WLST command automates the generation of approximately 150+ lines of XML configuration required for a new machine definition. Manually editing the config.xml file increases the risk of syntax errors by over 80%, making this command critical for error-free expansion.
3.Why is the Singleton Data Directory (SDD) mandatory for OAS clusters?
The Singleton Data Directory (SDD) is a centralized file system location that ensures 100% of global settings (like scheduler configurations) are synchronized. Without SDD, a 2-node cluster would face split-brain issues where changes on Node A do not replicate to Node B.
4.Which JMS Forwarding Policy is required for OAS Publisher high availability?
You should change the JMS Forwarding Policy from ‘Partitioned’ to ‘Replicated’. The ‘Replicated’ setting ensures that 100% of cluster members receive job topics, guaranteeing that if one node fails, another immediately picks up the scheduled report, essential for high-availability SLAs.
5.How do users access the OAS environment after scaling out?
A correctly scaled OAS environment uses an external Load Balancer (LBR) or HTTP Server. This component directs traffic to the active nodes, aiming for a response time under 200ms. Without an LBR, users must memorize specific host URLs, creating a single point of failure.
6.What role does Node Manager play in a multi-node OAS deployment?
Node Manager acts as the remote agent on each host, listening on port 5556 (default). It allows the Administration Server to send ‘start’ or ‘kill’ commands to managed servers. In a multi-host setup, a running Node Manager is 100% required for remote lifecycle management.
7.What happens to the OAS cluster if the Administration Server fails?
If the Administration Server is down, the Managed Servers on BIHOST1 and BIHOST2 continue to process user requests, maintaining 100% service availability. However, configuration changes and deployments cannot be made until the Admin Server is restored.
8.Are there specific network latency requirements for OAS clustering?
Yes, network latency between cluster nodes must be low, typically under 1-2 milliseconds. High latency can cause ‘stuck threads’ in WebLogic and lead to cluster synchronization failures, degrading system throughput by up to 40%.
9.How does scaling out differ from vertical scaling regarding risk?
While vertical scaling adds CPU/RAM to one box, it offers 0% redundancy against hardware failure. Horizontal scaling (Scaling Out) creates redundancy; if one host fails, the remaining nodes handle the load, ensuring business continuity and near-zero downtime.
10.What is the purpose of the ‘pack’ and ‘unpack’ commands in OAS scaling?
The ‘pack’ and ‘unpack’ commands are used to clone the domain securely. ‘Pack’ compresses the domain configuration into a .jar template (reducing size by ~90%), and ‘unpack’ expands it on the new host, creating the necessary directory structures and security files.
References